Intro to Your Template
Your website’s sidebar acts as your main dashboard. This is where you’ll access all the tools, settings, and features that control your entire site!
Let’s walk through the key sections you’ll be using most often:
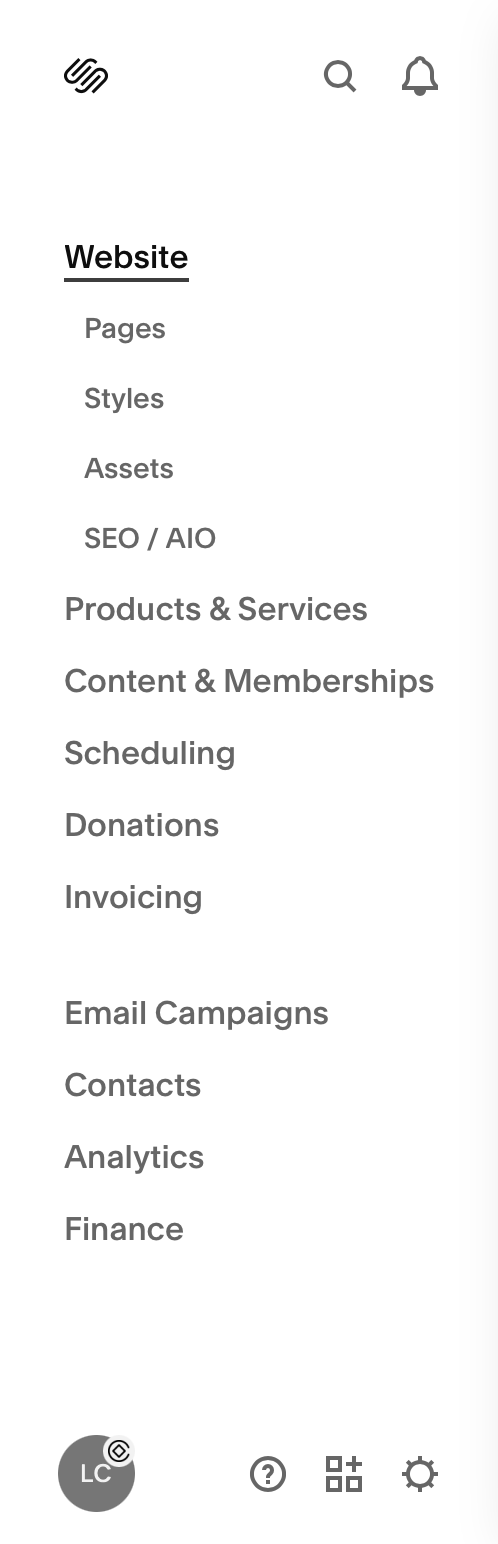
Website:
Pages: This is where you manage the entire structure of your site. You can add new pages, hide ones you're not ready to use, delete anything you don’t need, and rearrange the order with a simple drag-and-drop.
Styles: The Styles panel is where you’ll control your overall design, like your brand fonts, colors, buttons, form styles, and more. You can access it through the main Design tab, or use the paintbrush icon in the top right corner while editing any page.
Assets: This is your image library and stores all of the images and content you upload. You can add images in bulk (to make it fast to upload and access your brand imagery,), rename files for SEO and stay organized with folders.
SEO / AIO: This is the Search Engine and AI Optimization section of your website Use this area to optimize your site’s search engine visibility, edit metadata, connect Google Search Console, and more.
Products & Services:
Manage your store or service-based offerings. Add physical or digital products, create service listings, and handle inventory, pricing, and variations.
Content & Memberships:
Create gated content, set up member-only areas, and manage subscriptions. Perfect for creators, educators, or anyone offering exclusive access.
Scheduling:
If you offer appointments or bookings, this is where you’ll set them up. Sync with external calendars, add availability, and allow clients to self-book directly from your site.
Donations:
Accept contributions from your audience or community. Ideal for nonprofits, fundraisers, or creators offering free content but welcoming support.
Invoicing:
Create and send professional invoices directly through Squarespace. You can track payment status and set recurring payments too.
Email Campaigns:
Design and send marketing emails to your audience. This is built into Squarespace and connects easily with your site’s forms and mailing lists.
Contacts:
This section stores info from anyone who’s filled out a form or booked with you. It’s your built-in CRM to track leads and client info.
Analytics:
Track how your website is performing. Get data on traffic, popular pages, conversion rates, and more — all without needing external tools.
Finance:
Manage billing, payments, taxes, and subscription settings for your Squarespace account. You can also view invoices or upgrade your plan here.
Settings Panel:
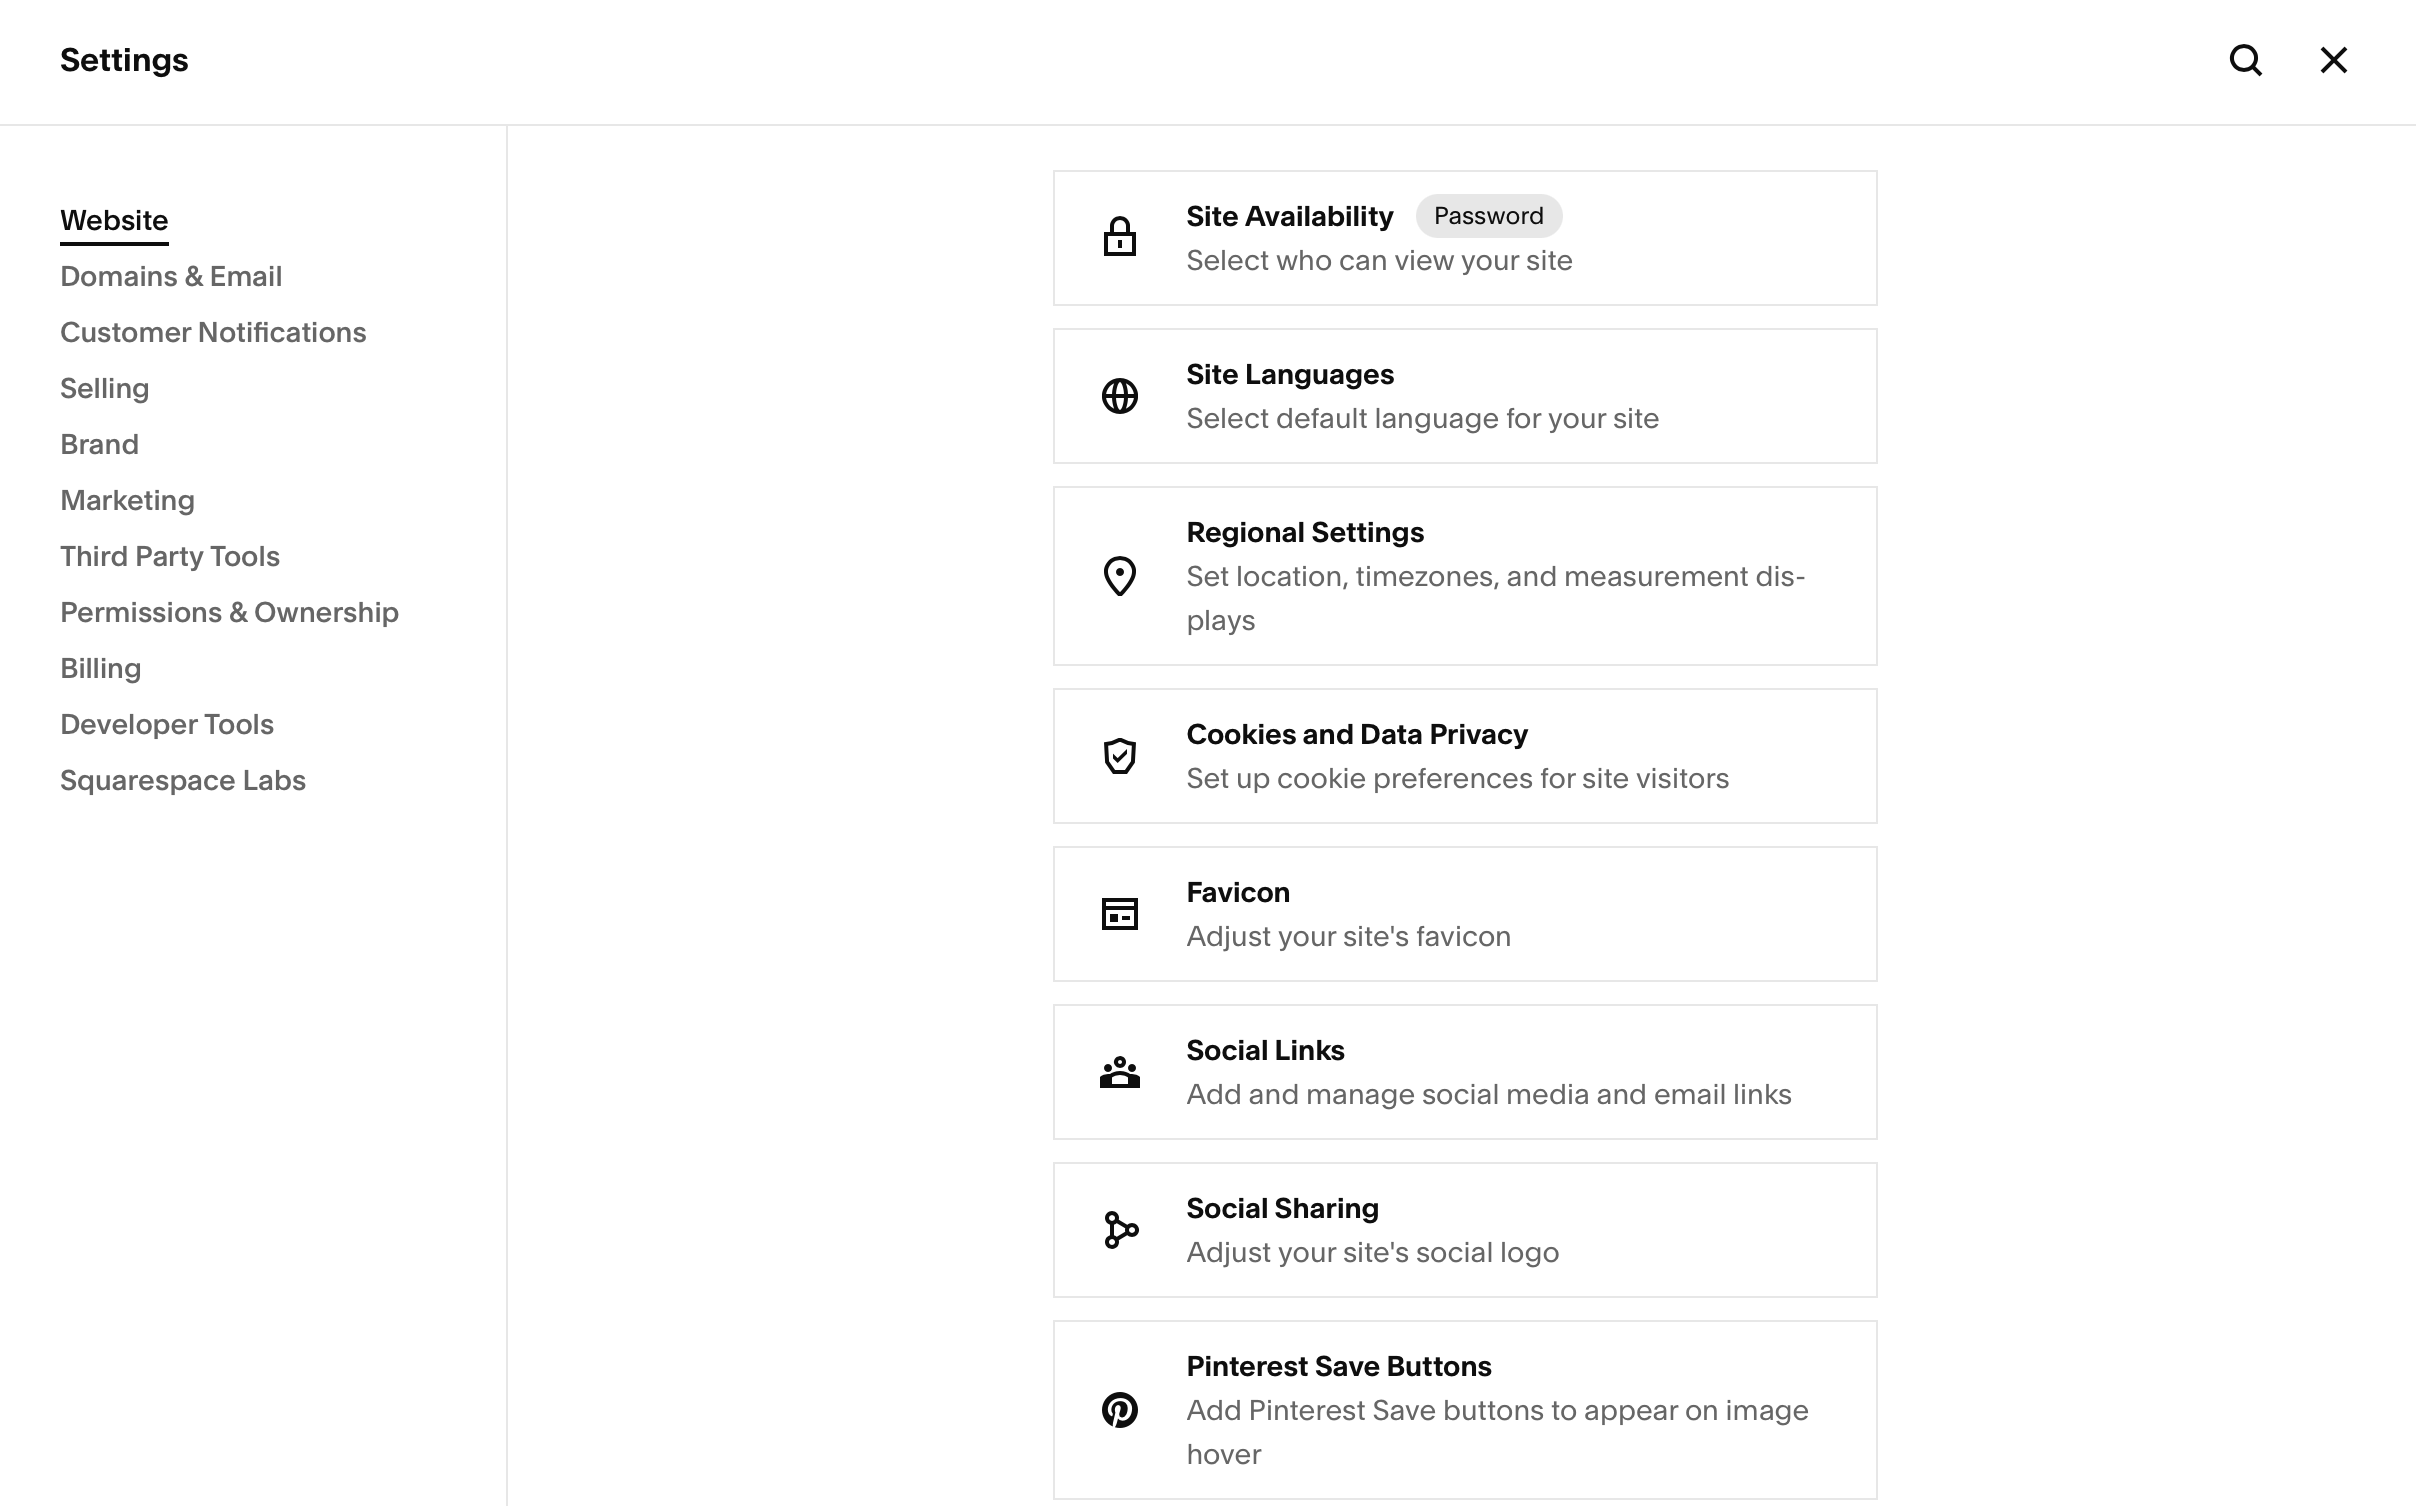
The gear icon in the lower-left corner of your Squarespace dashboard opens the Settings Panel. This is your central hub for managing the behind-the-scenes setup of your site.
Here’s what you’ll find inside:
Website – Control your site’s availability (private, password-protected, or public), set the default language, and manage general site info.
Domains & Email – Connect or purchase a custom domain, set up email addresses, and manage domain-related settings.
Customer Notifications – Customize automated emails like order confirmations or member welcome messages.
Selling – Set up payment processors, taxes, shipping, and checkout experiences if you're selling products or services.
Brand – Upload your site logo and icon (favicon), which appear in places like browser tabs and mobile previews.
Marketing – Manage SEO basics, social sharing images, and promotional pop-ups or banners.
Third-Party Tools – Integrate tools like Google Analytics, Facebook Pixel, and others using tracking codes.
Permissions & Ownership – Add contributors, transfer site ownership, and control access levels.
The Settings Panel is where all the essential “back-end” features live — it’s the place to go when you’re connecting your domain, managing integrations, or setting up your business basics.
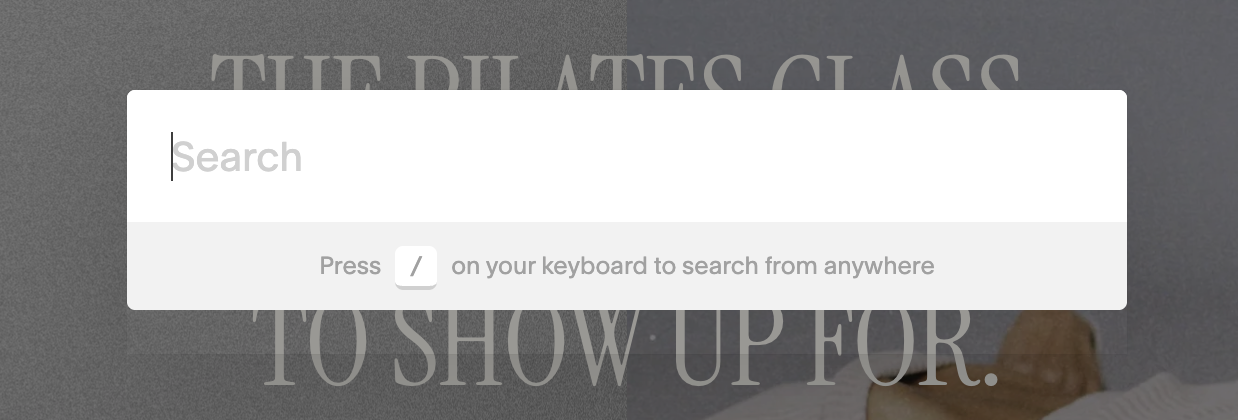
Time Saving Tip:
All these tabs and panels are a lot to memorize! On top of that Squarespace sometimes moves things around making it hard to navigate to different sections of your back end settings.
My favourite shortcut to use is hitting the '/' key on the keyboard to pull up a search tool!
From there I can search whatever I’m looking for on my website and it will pull it up immediately, saving me from scrolling through different sections.
Help Section:
Get access is to Squarespace's help centre and tutorial library.
Access by clicking on the question mark icon (next to your gear icon) at the bottom of the sidebar.
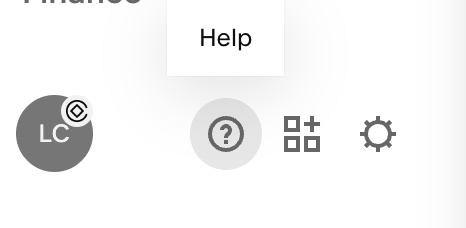
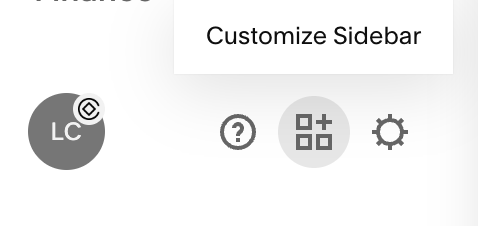
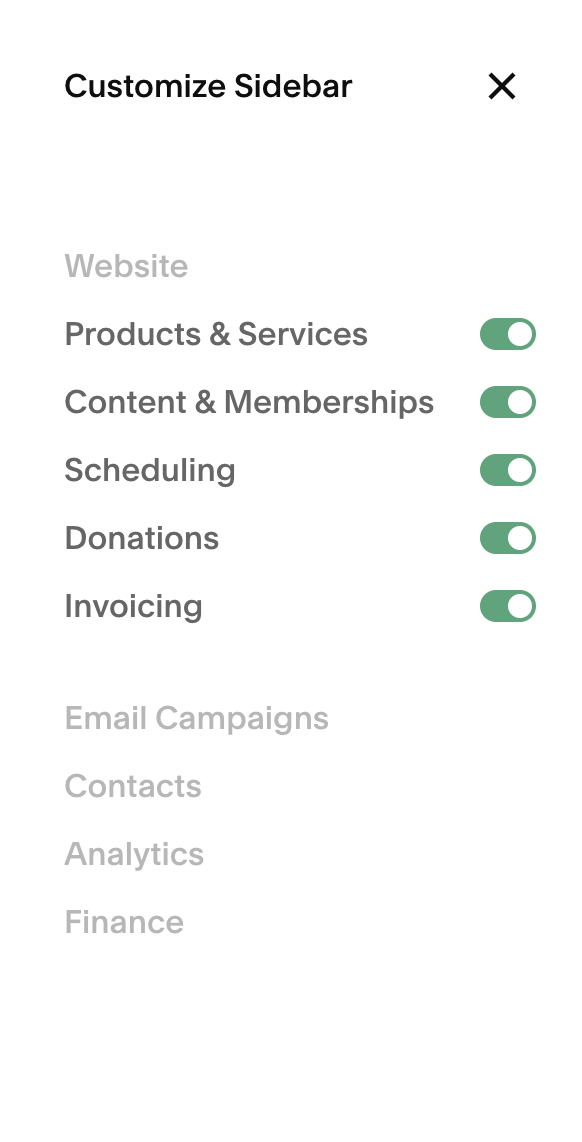
Customize Your Sidebar:
In the bottom corner of your side bar, in between your settings and help icons, you’ll see the ‘customize sidebar’ icon.
From here you can decide what you do and don’t want to display in your sidebar. This is a great way to reduce visual clutter and make things more streamlined if there are options in the sidebar you don’t use (e.g. hiding products/services if you’re not an e-commerce or service provider)